Running OpenShift on a single node (SNO) is a great way to create a lightweight cluster for development, testing, or edge deployments. This guide walks through the process of installing OpenShift 4.x as a Single Node Cluster on a Dell XPS 8490 using the Assisted Installer, leveraging only the internal disk of the desktop.
1. Prerequisites
Hardware Requirements (Dell XPS 8490)
- CPU: Intel i7 or i9 with virtualization enabled (VT-x)
- Memory: 32 GB RAM minimum (64 GB recommended)
- Storage: At least 250 GB available on the internal NVMe drive
- Storage: Secondary disk of 1TB
- Network: Wired or wireless connectivity with internet access
Software Requirements
- A Red Hat account with OpenShift entitlements
- Access to console.redhat.com
- A bootable USB drive (8 GB or larger)
Network Requirements
- Domain: Register a domain to install your cluster
- No DNS wildcard configured – only configure post installation
NOTE: It is advised to clean all writable storage. You may do so by booting from a Fedora Live USB and running the following:
- Identify the disk with lsblk
- Use dd to Overwrite the Entire Disk
sudo dd if=/dev/zero of=/dev/sdX bs=1M status=progress2. Create the Assisted Installer ISO
- Go to console.redhat.com.
- Select the Red Hat Enterprise OpenShift from the Red Hat Hybrid Cloud Console drop down.
- Select Cluster List from the left menu, then select the Create Cluster button.
- From here, select the Datacenter tab, then the Create Cluster button.
- Provide cluster details:
- Cluster name
- Base domain
- OpenShift version
- Number of control plane nodes, choose 1 ( Single Node OpenShift )
- Configure networking (static or DHCP).
- Click Next.
- You can choose to install Operators from here, but I have found it better to install the operators after the cluster is up and running.
- Click Next.
- From here click the Add host button.
- Select your Provisioning type: Full image file – Download a self-contained ISO.
- Optional – Add an SSH public key to connect to host during the discovery for troubleshooting.
- Click the Generate Discovery ISO button.
- Click the Download Discovery ISO button.
3. Boot the Dell XPS from the Discovery ISO
- Write the ISO to a USB drive. If you are on a Windows based system, you can use a tool like Rufus to create the bootable ISO.
- Insert the USB drive into the Dell XPS.
- Boot from USB and allow the node to register with the Assisted Installer.
4. Confirm Details
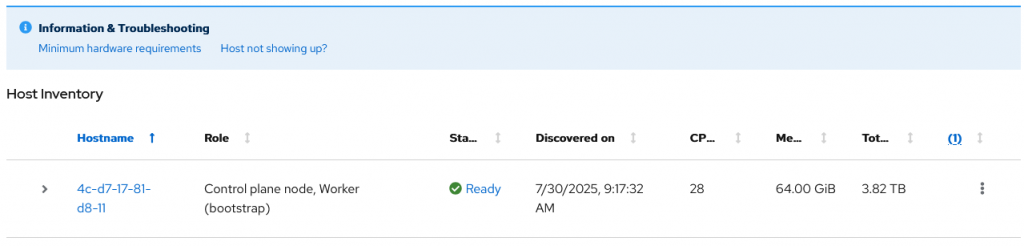
Once the Dell XPS appears as a discovered host in the Assisted Installer:
- Click the > next to the host name to view details of the system
- You should see the Role set to Control plane node, Worker (bootstrap) for a SNO cluster.
- Click Next.
- Approve the host for installation.
5. Deploy the Single Node Cluster
- Start the installation from the Assisted Installer UI.
- The process will take around 90 minutes.
- Once completed, you can download the kubeconfig and kubeadmin password from the cluster page.
6. Access the Cluster
- Add the API and apps DNS records to your DNS provider.
api.xps.planenotsimple.com A Simple – No 192.168.1.14
*.apps.xps.planenotsimple.com A Simple – No 192.168.1.14 - Access the OpenShift console: https://console-openshift-console.apps.cluster.example.com
- Log in with kubeadmin and the password from the Assisted Installer. Remember to store the password somewhere accessible as you will not be able to recover this password.
7. Install the LVM Storage Operator
- Go to Operators → OperatorHub in the OpenShift web console.
- Search for LVM Storage (or Local Storage Operator if you prefer that).
- Click Install (use the default settings in the openshift-storage namespace).
8. Create a StorageCluster
After installation, create a StorageCluster (DO NOT user the GUI) create a file name lvmcluster.yaml:
apiVersion: lvm.topolvm.io/v1alpha1
kind: LVMCluster
metadata:
  name: lvmcluster
  namespace: openshift-storage
spec:
  storage:
    deviceSelector:
      paths:
        - /dev/sdb
    deviceClasses:
      - name: vg1
        volumeGroup: vg1
        deviceSelector:
          paths:
            - /dev/sdb
defaultDeviceClass: vg1Apply it ( See Setup OC on your Client Machine ):
oc apply -f lvmcluster.yamlVerify a storage class was created:
Run the following: oc get storageclass
NAME                 PROVISIONER   RECLAIMPOLICY   VOLUMEBINDINGMODE      ALLOWVOLUMEEXPANSION   AGE
lvms-vg1 (default) topolvm.io Delete WaitForFirstConsumer true 2m49sWhy Use SNO on a Dell XPS?
- Perfect for local development and demos
- No external servers or disks required
- Great for disconnected or edge scenarios
With these steps, you can run a full OpenShift cluster on a single Dell XPS 8490 machine using only the internal disk. The Assisted Installer simplifies the entire deployment process while providing a full OpenShift experience on a single node.